Official Manual · Getting Started
Shadowrocket
Import a Subscription and Connect
Follow the steps in order: add details, choose a mode, connect, verify, and troubleshoot. First establish a repeatable connection, then adjust rules and automatic connection settings.
Before you begin: Have your connection details ready
First identify which type of details you have: a subscription link that updates a server list, or a single server's share link, QR code, or parameter list. The entry points are similar, but their purposes differ. Do not enter a subscription URL as Host, and do not assume that a link is a subscription just because it begins with HTTPS. If you are unsure, check the accompanying information before proceeding.
STEP 01 / ADD
Add Server: Add a server or import a subscription
This step only enters your connection details. Continue to choose a connection mode once the server entry appears on Home.
For existing server details
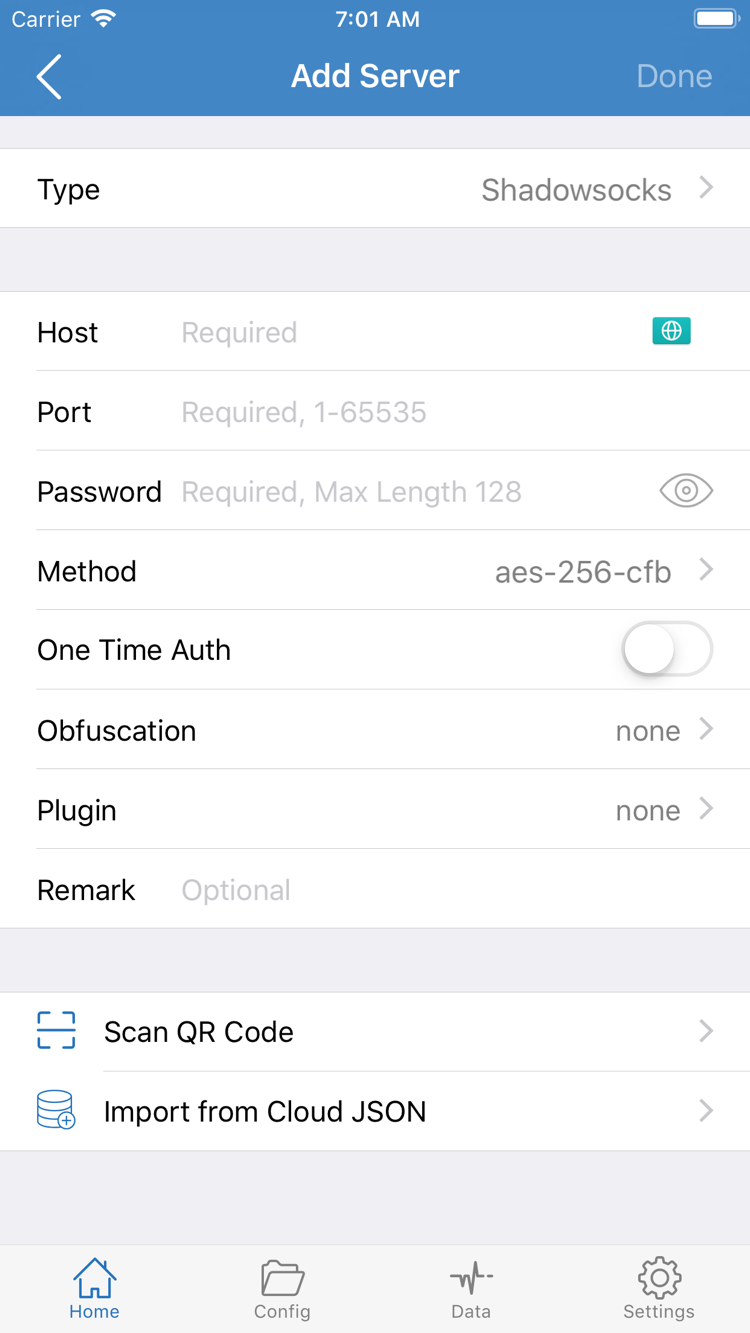
Open Home in Shadowrocket, find Add Server, and open it. Tap Type first and choose the protocol that matches your existing details. Then enter Host, Port, and the authentication fields required by that protocol. Password and Method in the screenshot are fields shown for a specific Type; other Types may show different fields. Match the fields on the current screen with your source details rather than treating the screenshot fields as requirements for every protocol.
Enter the server's domain or IP address in Host, without a web path. Enter the supplied port in Port. When pasting, check for leading or trailing spaces and line breaks, especially in authentication fields such as Password. If your details also include TLS, SNI, or transport settings, check each one against the source details in the same entry. Do not guess values based on the protocol name. Save the entry, then check the new record in the SERVER group on Home.
For an existing subscription link
Open Add Server again, choose Subscribe in Type, paste the complete subscription link into the corresponding address field, and save it with a note that helps you identify it. Use the full address for retrieving a list, not a server's Host. A subscription URL may contain identifying information; do not include it in public screenshots, chat records, or diagnostic examples.
After saving, let the subscription complete its first retrieval, then return to Home and check the list. If the subscription group appears but contains no servers, check the update result and make sure the link is complete. Do not immediately add the same subscription again. Duplicate entries make later selection and updates harder to verify. Correct the existing entry and update it again to see whether the issue is resolved.
For an existing QR code or share link
Use Scan QR Code to read a QR code and grant camera access when prompted by the system. After importing, open the entry and check Type, Host, Port, and authentication fields. Import from Cloud JSON is for remote JSON details in a specific format, not a general-purpose entry point for any web page or subscription. For the difference between share links and subscriptions, see Share links and subscription links.
Finally, select the server you plan to use on Home and confirm that the selection indicator is on the intended entry. An entry in the list only means the details have been saved; it does not mean the remote server is available. Next, set Global Routing to a mode you understand, then test the connection.
STEP 02 / ROUTE
Global Routing: Choose one of three modes
The server determines where the connection goes; Global Routing determines how requests choose a path. Check these separately.
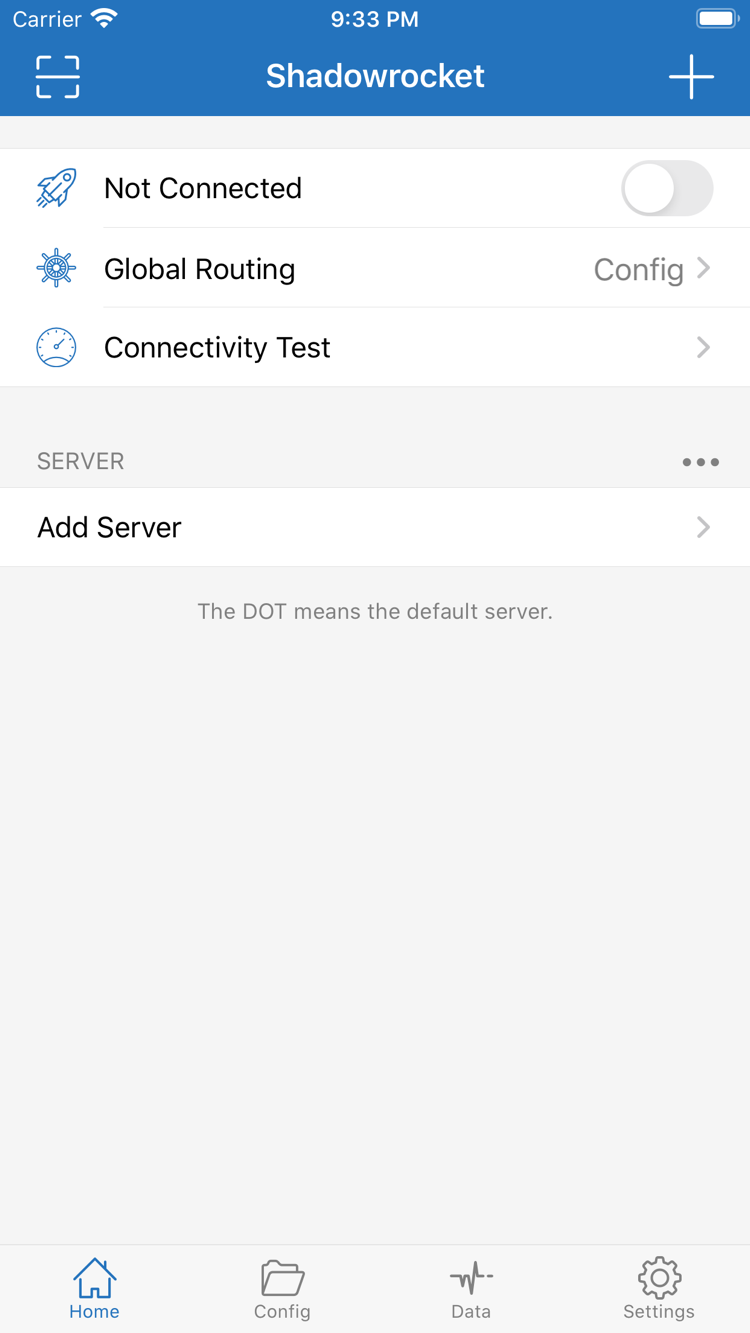
Return to Home and open Global Routing. The three modes are Config / Proxy / Direct. Avoid switching modes repeatedly at first. Decide whether you are checking the server itself or the rules in a configuration file, then choose the corresponding mode. After changing modes, reopen the target page and start a new request; do not judge the result from a page that was already loaded.
Config: Route according to the active file
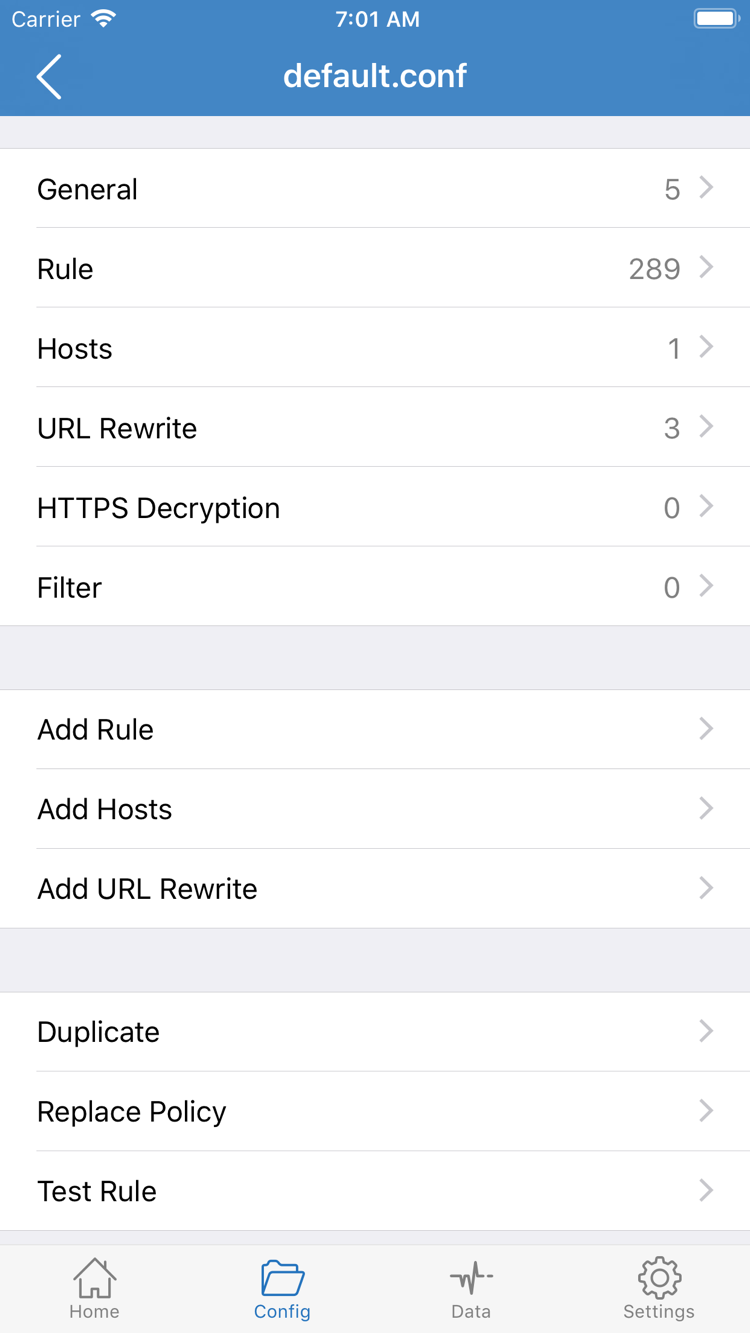
Choose Config for everyday rule-based routing. Then open Config and confirm which configuration file is actually in use, rather than just looking at a filename in the list. The configuration editor has sections such as General, Rule, and Hosts. This tutorial focuses on matching conditions and policies in Rule; you do not need to modify every section to make your first connection.
Rules are checked in order. Specific rules usually belong before rules with broader coverage. The syntax below illustrates policy meanings; it is not a complete configuration to replace an existing file. PROXY must also match a policy in your actual configuration. Review the existing file and make sure you understand it before editing; keep a copy of the original first.
[Rule]
DOMAIN-SUFFIX,example.com,PROXY
IP-CIDR,192.168.0.0/16,DIRECT
DOMAIN-SUFFIX,ad.example.com,REJECT
FINAL,PROXY
PROXY uses the corresponding proxy policy; DIRECT uses a direct path; REJECT rejects the request. FINAL is the policy used when none of the preceding rules match. The Proxy mode in the interface and the PROXY rule policy are not the same control. Selecting a mode does not change Rule.
Proxy and Direct: Use them for comparison
Proxy can help check the proxy path for the selected server and reduce the effect of regular rule-based routing during troubleshooting. It does not mean that all system traffic on the device necessarily uses the same path. Direct provides a comparison with the local network; turning on the connection switch does not automatically route traffic through the selected server.
If a target page works in Proxy but fails in Config, check the active configuration and matching rules. If local network access also fails in Direct, first restore Wi-Fi or cellular connectivity. If you do not understand a rule yet, leave it unchanged. For a complete guide to maintaining configurations, see the beginner-to-advanced manual.
STEP 03 / CONNECT
Home: Turn on the connection
Confirm the selected entry and mode, then grant permission. System authorization and server availability are separate things.
Return to Home. Check that the selected entry in the SERVER group is correct, then confirm Global Routing is still set to the mode chosen in the previous step. The selected entry may change after a subscription update, so do not rely only on your earlier selection. Once confirmed, turn on the connection switch next to Not Connected at the top.
On the first connection, the system asks permission to add a VPN configuration. Confirm that the prompt was triggered by this Shadowrocket action, allow it, and complete any passcode or biometric verification requested by the device. This step grants network access on the device; it does not create server details or confirm remote authentication. If you cancelled permission, return to Home, turn on the switch again, and follow the system prompt.
After granting permission, return to Home and check whether the status at the top changes from Not Connected to a connected state. If the switch immediately turns off again, first check that system authorization is complete, then confirm that the selected server entry is complete. Do not repeatedly toggle the switch, rebuild the subscription, change DNS, and switch modes all at once. Keeping the state stable helps identify the specific point of failure.
Once the status is stable, run Connectivity Test on Home. It checks connectivity using the app's current test settings; it does not guarantee every webpage, protocol, or routing path. After seeing the test result, continue with the real-world access check in the next step. The connection status at the top alone does not confirm that a target request used the expected proxy path.
STEP 04 / VERIFY
Verify the connection: Compare real access with Data
Check a new request, the target page, and the rule result. Do not treat a single test value as the whole picture.
First open a page that normally works to check basic connectivity, then open the target page for this test. Reload it or open a new page if needed so browser cache does not make old content look like a successful request. If basic connectivity works but the target page fails, note the server, Global Routing mode, and symptoms, then open Data to inspect the requests generated this time.
In Data, locate the entry by request time and target domain. If the details show a matching rule, policy, or connection information, compare these with the expected path. A request routed through DIRECT in Config may be exactly what the rule specifies; it does not mean the connection switch has failed. Likewise, if REJECT appears, check the matching rule before changing servers.
If the target request should use PROXY, check that the matching policy is correct and that it uses the expected server. If it should use DIRECT, check whether the target is meant to be handled by the local network. Webpages often load resources from multiple domains. If a page fails to open, the cause may be a resource request; inspect related entries instead of searching only for the domain in the address bar.
- Keep the server unchanged. Compare Proxy and Config, then repeat the same type of access.
- Keep the mode unchanged. If you already have another usable server entry, switch to it for comparison.
- Record the target, mode, result, and matching policy each time. Do not mix results from different times.
If a page works in Proxy but not Config, return to Config and check the rules and final policy first. If both fail but basic access works in Direct, check the server details and remote status first. After confirming a correct rule match, restore Config for everyday use and verify a second target that needs a different path in the same way.
Success does not depend on a fixed latency value. The connection status should be stable, the actual target should be accessible, and any request path you can inspect should match your configuration. To learn more about the roles of Home, Config, and Data, see the interface terminology reference.
STEP 05 / CHECK
Settings: Check each failure point in order
Keep the original configuration and change one item at a time. Check basic connectivity first, then details, mode, and rules.
Import failed or the list is empty
First confirm that the subscription link is complete and that you have not entered a single-server share link as Subscribe. Check whether the current network can retrieve the subscription and review the update result shown in the app. An empty server list does not mean the client has not been purchased, and repeatedly adding the same entry will not solve the problem. For changes to subscription validity or server details, check the source of your existing details.
The switch is on, but access fails
First check whether basic network access works without the proxy. If the Wi-Fi network requires browser authentication, complete that first. Then check the selected server's Host, Port, authentication fields, and transport settings, paying particular attention to spaces introduced when copying. If the issue affects only one server entry, correct that entry rather than changing the entire configuration.
Next, compare Global Routing modes as described in step two. If Config fails but Proxy works, check the active file, rule order, and FINAL. If both modes fail, check the remote connection and authentication. If the issue appears to be domain resolution, review the current DNS settings and related diagnostic information. Do not paste in multiple unfamiliar DNS settings at once, as this can obscure the original issue.
The test fails, but webpages open
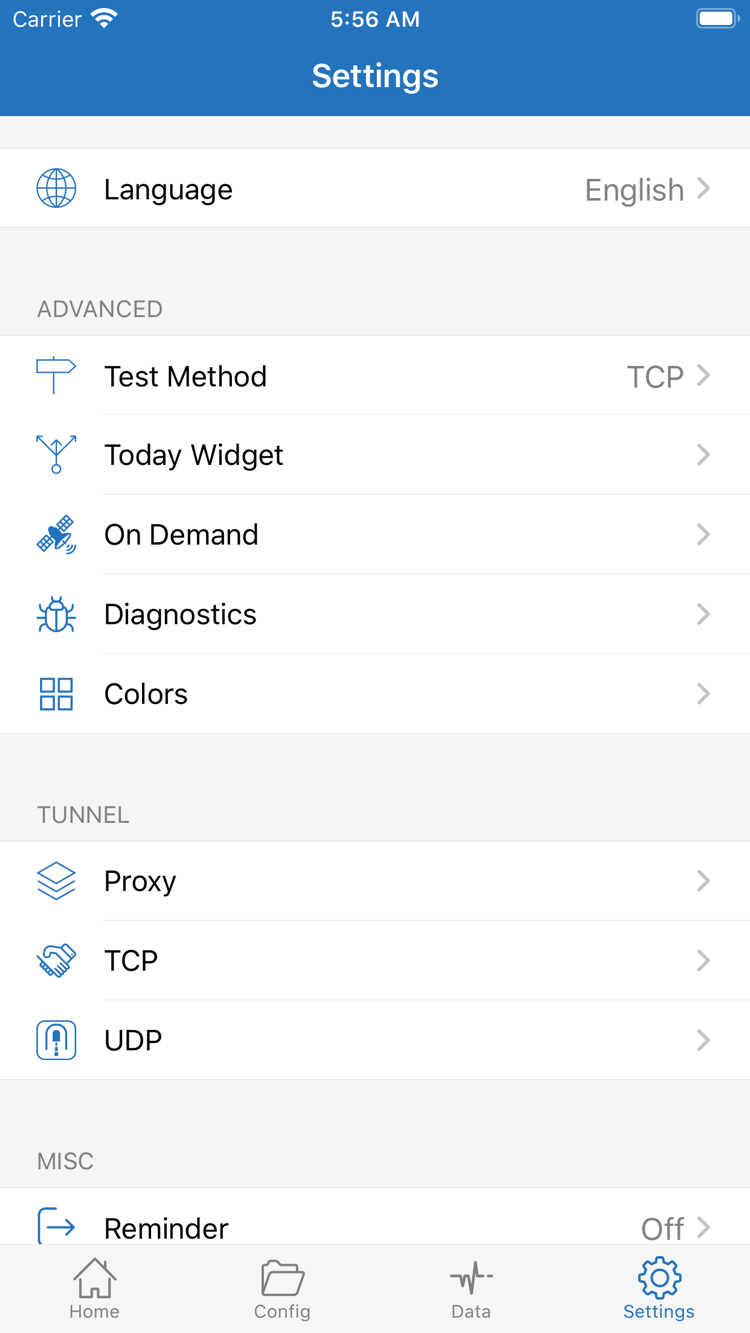
Check Test Method in Settings. The test method may use a different path from actual webpage access, so a failed Connectivity Test alone does not prove that all access is failing. Conversely, a successful test does not guarantee that a particular target will work. Consider the test result, actual page result, and Data entries together. If needed, keep the test method unchanged and compare one server or mode.
The connection turns back on after being disabled, or only some requests fail
Check On Demand in Settings to see whether automatic connection conditions are enabled for the current network. To make a manual comparison, note the original setting and temporarily disable the relevant conditions. Restore them as needed after testing. If only some requests fail, check the relevant rules and transport requirements first. Do not start by changing every Proxy, TCP, and UDP setting in Settings.
For more clues, use Diagnostics and follow the results provided by the app. Before sharing screenshots or logs, remove the complete subscription URL, Password, authentication details, and personal browsing records; include only the necessary symptoms. For more scenarios, see Troubleshooting. For a detailed sequence of checks when the switch is on but there is no access, see the connected but no internet checklist.
After setup: Keep a working configuration
Once the selected server, active configuration, and rule results match, continue with routine maintenance.
Keep a verified working configuration, and check whether the original server is still present after subscription updates. If an issue occurs later, reproduce it with the same target and mode before deciding whether to check your details, switch networks, or adjust rules. Do not treat automatic subscription updates and replacing an entire configuration as the same action. Replacing a configuration may also change DNS, Rule, and other settings, all of which need to be checked again.
This completes the initial setup. To understand how permissions, Data, Settings, and long-term maintenance fit together, continue to the beginner-to-advanced guide. There is no need to configure every feature during the first connection.